A GT-40 BUILD STORY
BUILDING A KELLISON GT-40K IN THE '70'S
By Tom Piantanida
Chapter One The Drivetrain
The Kellison GT40K is probably the closest I'll ever get to owning a Ford GT40; Forget the time when I was a graduate student raising a family on $8500 a year, and the Ford GT40 camera car from Grand Prix was advertised for $6000. I always thought (and still do) that the GT40K was a more accurate rendition of the Ford GT40 than the other pretenders, like the Fiberfab Avenger and Valkyrie, the Ferrer; arid The Sebring (although I never actually saw the Sebring in the glass so to speak.
A prime example of a Ford GT40 feature that was absent from the other kit cars was a pair of doors that extended into the roof. Two iconic elements of the original Ford GT40 that I first saw on display at Watkins Glen in October 1964 were those distinctive doors and the sculpted air inlet on either side of the backlight. (Many of the other distinctive Ford GT40 design elements, such as the spoiler and the definitive GT nose, didn't appear on the original model.) Unfortunately, neither Fiberfab nor Kellison got the upper air inlets right. That was a disappointment that I dealt with on the GT4OK that I built.
I acquired my GT40K in Houston in 1971 as a partially completed kit. It had an unmolested body on a VW pan, for which most of the Ford GT kits were designed, one exception being the Fiberfab Valkyrie, which required a tube frame. Included in the deal were a 1200cc Volkswagen engine and transaxle, "mag" wheels and adapters, and BFG redline tires. The highback fiberglass seat shells and several small sheets of Plexiglas were stowed inside the car.
When a friend and I trailered the GT40K home, my five-year-old daughter took one look at the car and burst into tears. It took us a while to figure out that she was very unhappy because there was no back seat for her to ride in; she figured that we were going to have to leave her at home when we went for rides. The GT40K filled most of the 40-year-old one-car garage that was attached to the house that I rented with my wife and two daughters.
My first decision was that the 1200cc VW engine had to go. Searches through high-performance VW catalogues, such as EMPI, quickly established that more power could be had by the usual hop-up procedures of increasing displacement and compression ratio, installing hot cams. Webers, headers, etc., but to get decent power from the bug required cubic bucks. I opted for a cheaper way out a Corvair flat six with a stock displacement more than double that of the VW.
I was able to buy a wrecked 1966 Corvair Corsa convertible at a low enough price that I could part it out (in my driveway, which the landlord hated) and wind up with a free 140HP engine and a windshield. (The GT40K was designed to accept a 1965-69 Corvair windshield.) I traded the Powerglide for a four-speed Saginaw transaxte, and sold the rest of the car top mechanism, seats, wheels and tires, harmonic dampeners (Corvair convertibles needed them to control body torsions at some frequencies), etc., winding up with the desired items and a small profit.
The 140HP Corvair engine didn't have many miles on it, but my next decision, which was precipitous, required that I rebuild the engine. I had decided that as long as the Ford GT40 was mid-engined, my GT40K would be, too. Engines don't care much which way they rotate; in fact, the Corvair flat six rotates the opposite way of most other American engines. Other than the starter, which gets the engine started off in the right direction, the part that controls the engines direction of rotation is the camshaft.
Crown Manufacturing sold a reverse-rotation Corvair camshaft for people who wanted to power their dune buggies with the flat six without flipping the ring gear in their bug transaxle, or by bolting the Corvair up to a non-flippable Type 2 WV transaxie. Crown hadn't counted on someone like me, who wanted to mount the Corvair in the mid position and still use the stout 1966 and later Saginaw transaxle, which used the same size gearsets as the full size Chevy of that era.
When I had flopped the pistons to compensate for the thrust offset, now that the engine was to turn the other way, inverted the engine louvers so that the crank wouldn't sling oil into the engine breather (yeah! yeah, I know its a Corvair, and its supposed to sling oil), and installed the reverse-rotation camshaft, it dawned on me that needed a reverse-rotation starter. I called Crown Manufacturing for advice, and they suggested that I use a WV starter, which rotated the right way. But, of course, the VW starter doesn't fit. That prompted a three-month search for the elusive reverse-rotation Corvair starter.
Electrically, reversing the direction of the starter is simple; just rewire the brushes to the opposite polarity, but the real problem is that starters have an over-running clutch that permits them to transmit torque in only one direction of rotation. Ultimately, I found a Chris-Craft starter drive that was designed for a reverse-rotation Chevy V-8. This starter drive would work if' I machined the internal spiral splines off the Corvair starter shaft and pinned the Chris-Craft starter drive (it has both internal and external spiral splines) in its place.
The first time I ran the starter drive out to the limits of its splines, it locked into place it's supposed to and I thought that I had goofed severely. It turns out that engine torque releases the starter gear, which then slips back down the spiral spline. When I tried the starter on the reverse-rotation Corvair engine, it worked like it was a factory setup.
After starting the Corvair, the very next thing I did was to pen a letter to Crown Manufacturing to let them know that I could supply reverse-rotation Corvair starters. During the succeeding five years, I sold seven starters at a small profit, but every little bit helps when you're a student with a growing family.
Obviously, a Corvair engine is not going to fit on the pad of the WV pan where the back seat once rested. With much measuring and remeasuring, I truncated the VW pan just about where the central spine split into the two rear frame horns. I had calculated that a rear subframe attached to the pan at that point would allow the use of the fully independent (no swing arms!) Corvair trailing-arm rear suspension and still maintain a wheelbase of 93.6 inches, more or less. The location turned out to be just right, but the cut was an unkind one, as I'll reveal further on.
The now-surplus WV engine, transaxle, wheels, brakes, etc. were turned into cash to promote the project. The rear subframe was going to be a bit of a challenge; I had no materials; no machine tools, and no welder. I met the challenge by using surplus Unistrut to fabricate the frame, boxing the U-sections where necessary; and by using the school machine shop and welder after hours. On those nights when I could use the shop, I fabricated subframe members one or two at a time and carried them home. They lived in my bedroom, next to the Corvair windshield that I was protecting from two kids and a dog.
When I had all or most of the pieces cut and fitted, I would weld several pieces together, clean them, and carry the subassembly home. As the subframe progressed, the assembly got heavier and heavier; Unistrut is not the world's lightest material.
Ultimately, I had to employ the services of the school machinist, who fortunately had a keen interest in the project. Eventually, we completed the subframe and I was ready to attach it to the WV pan, well, actually to a bulkhead that divided the cockpit from the engine bay.
The rear subframe included spring pockets and shock mounts to accept the Corvair rear springs and shock absorbers, attachment points for the Corvair trailing arms, and the rear motor mount. A word about the rear motor mount. The Corvair transaxle normally mounts to a cross member bolted to the Corvair unibody, but the subframe that I fabricated had no corresponding crossmember. Instead, the transaxle was suspended from a crossrnember between the spring pockets.
Normally the transaxle has a sheetmetal cover over the differential housing, but for this application; I made a new cover of plate steel. The plate would lie flat on the differential housing and be bolted to it using the normal attachment points. To this plate, I welded a vertical L-shaped bracket that hung from the crossmember and was isolated from it by rubber mounts.
It may not be common knowledge that the Corvair engine is not centered on the midline of the Corvair, but offset so that the half-shafts can be equal in length. The "rear engine mount" the front engine mount in this application has the offset engineered into it, so the mounting points on the subframe must take this into consideration. The subframe was drilled to use the stock Corvair motor mount, which needed to be notched slightly to clear a high-volume oil pump.
Because Corvair cylinder heads are symmetrical and can be interchanged, the same is true for Corvair headers. I was able to use aftermarket headers by swapping them side-to-side, leaving the collectors facing the rear of the GT40K. A pair of glasspak mufflers completed the exhaust system. On the top end, I discarded the four single-barrel carburetors in favor of a central 390-CFM Carter AFB four-barrel carburetor on a tube manifold. Hydraulic master and slave cylinders from Neal Hydraulics actuated the throttle linkage. Another pair of cylinders operated the clutch
Next time we'll get into assembling the Kellison body, and some of the modifications that were necessary to accommodate the Corvair drivetrain and to undo some production compromises.
BUILDING A KELLISON GT40K IN THE '70S
By Tom Piantanida
Chapter Two: Bodywork
Jim Kellison took some liberties in designing the GT40K. Or perhaps he anticipated that Ford would make the Lemans nose (which Ford tested at that circuit in 1965) standard on the GT40. Whatever the case, the GT40K had a longer nose than either the earlier GT40's or the later "standard" nose. The GT40K also lacked the removable hood found on the GT4O, which included the distinctive cooling-air outlets. Like their counterpart on the Lemans nose; the Plexiglas headlight covers start at the leading edge, rather than a few inches back, as on the "standard" GT40 nose. The extra expanse of unbroken fiberglass made the nose of the GT40K seem disproportionately long.
As I examined the body, I became aware that the left and right doors were slightly different; the right door had a cast-in relief where the Plexiglas window would be set into it, but the left door didn't. Correspondence with other owners of GT40K's revealed that there were probably two types of doors those with reliefs, and those without. Other owners reported getting mismatched doors, as I had. I eventually routed a recess into the left door, and increased the depth of the recess in the right door. But that was not the only problem with the doors.
Because I had not purchased my GT40K body from Kellison directly, I had no way of knowing whether the following problem that I experienced was due to factory "tolerance" or to subsequent mistreatment by the previous owner. The problem was that when the doors were installed on the body, the roof panels angled up a few degrees, so they would not align with the roof. The solution, after much soul searching, was to remove a wedge from the inside of the doors just above the window, bend the doortops down, and reglass them. Then they fit snugly.
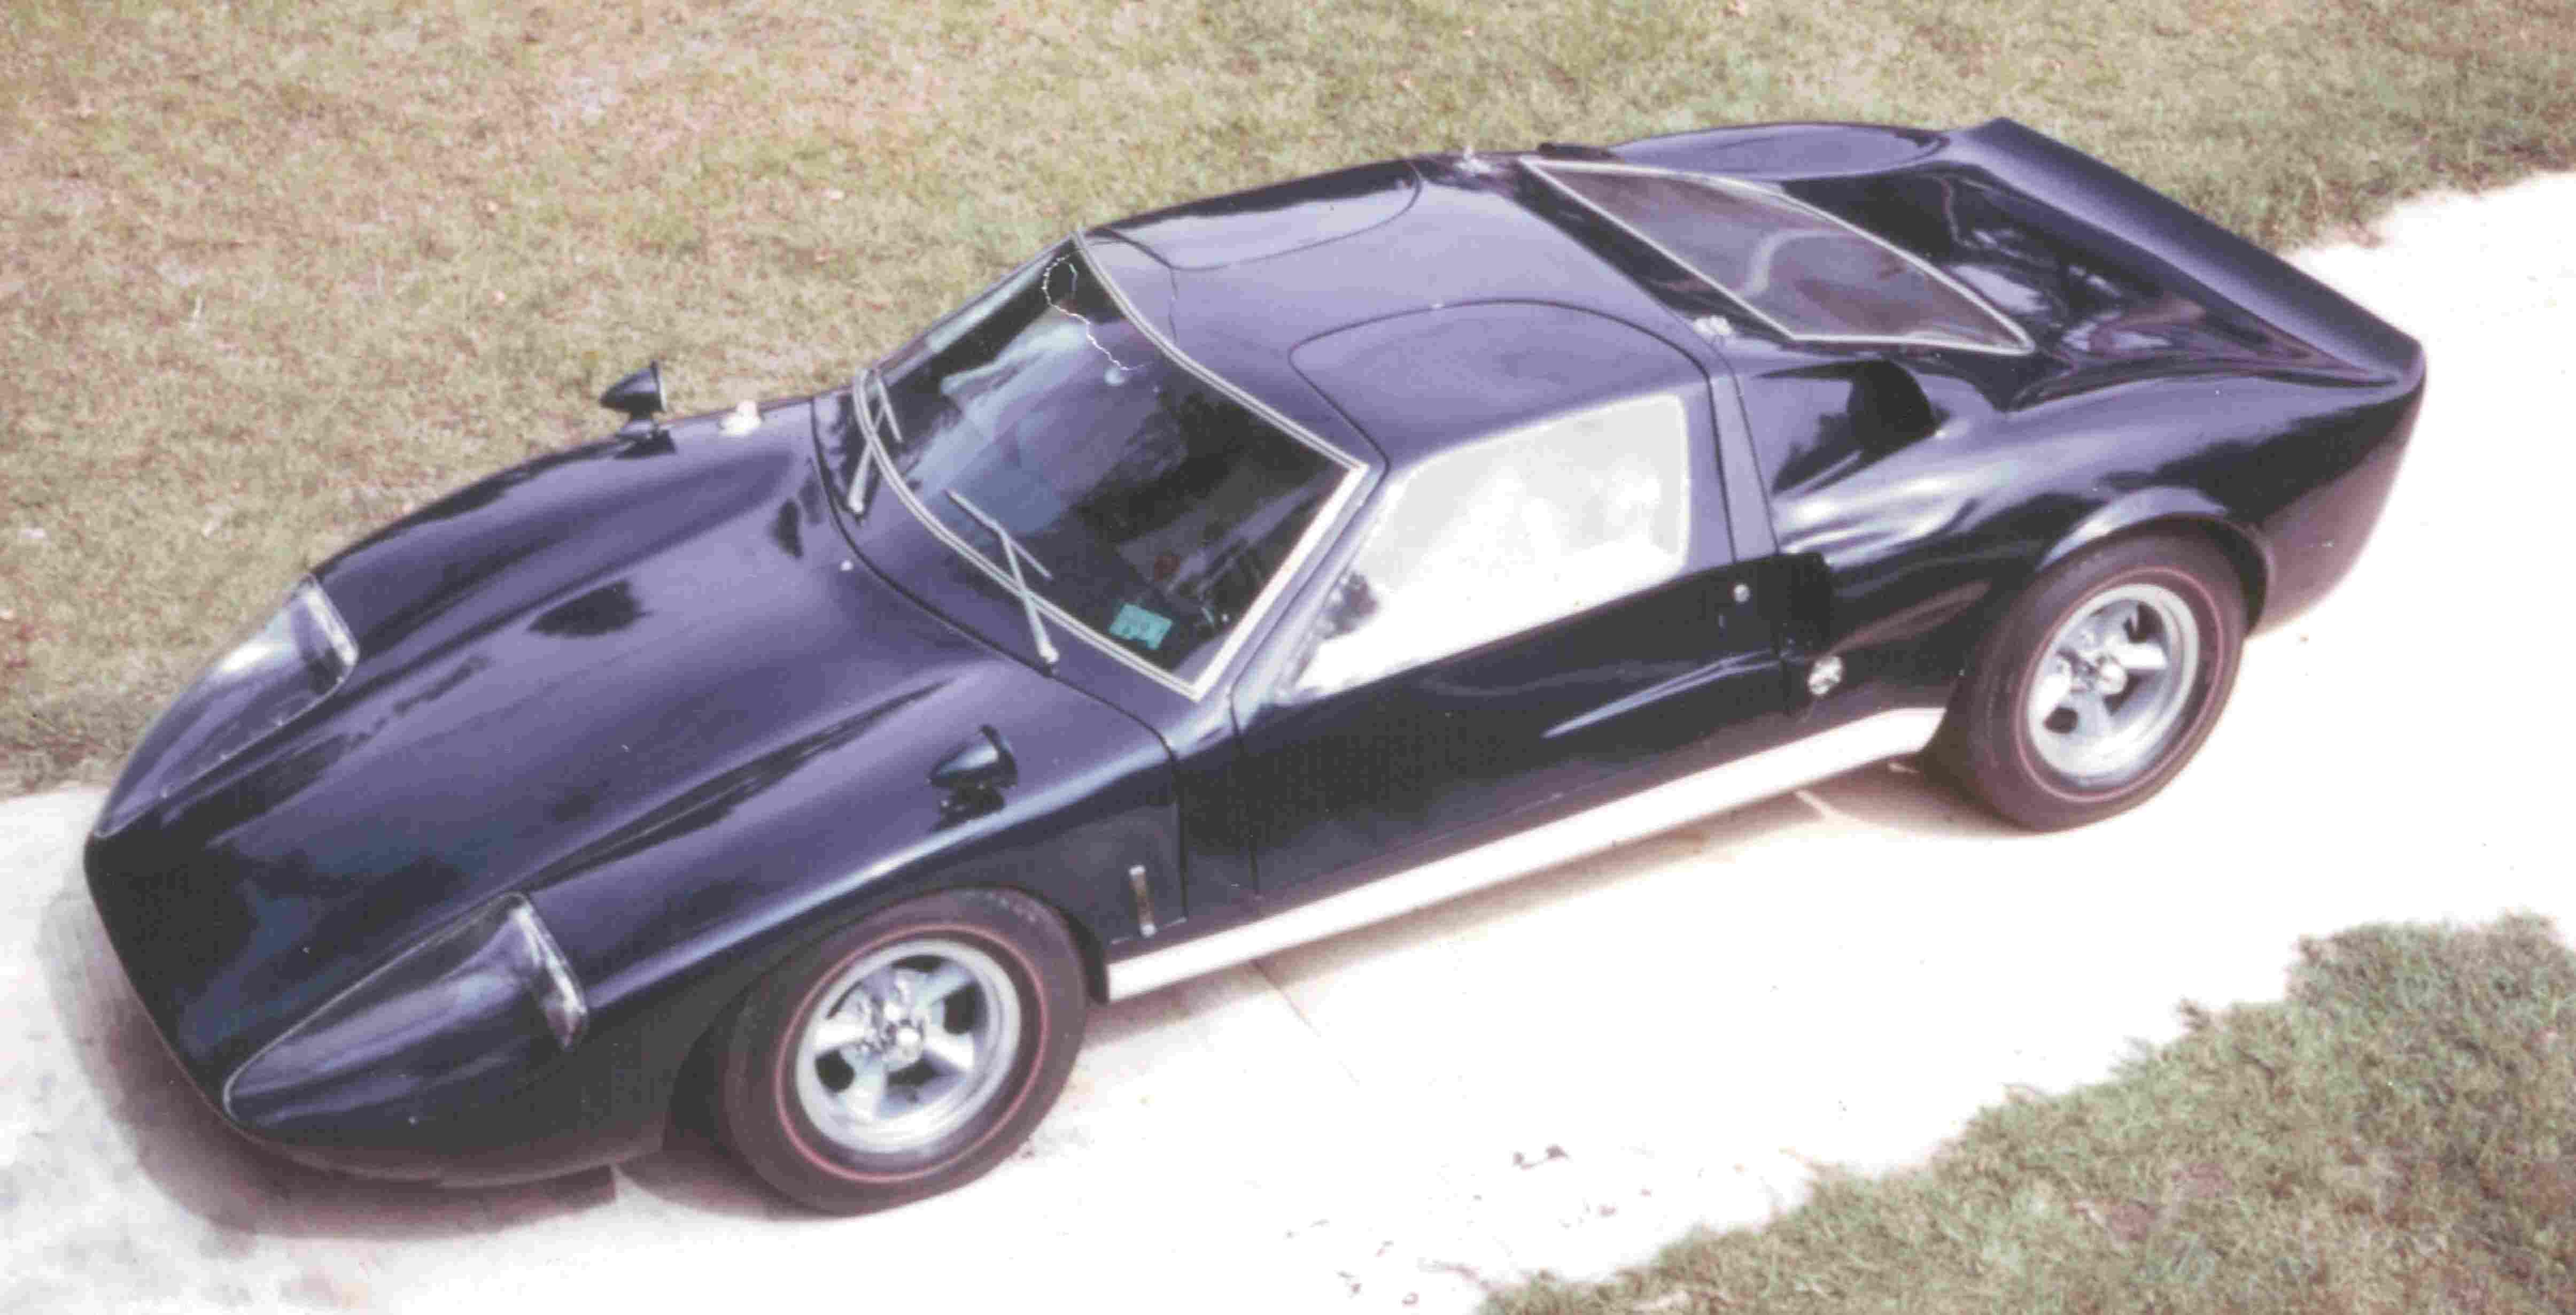
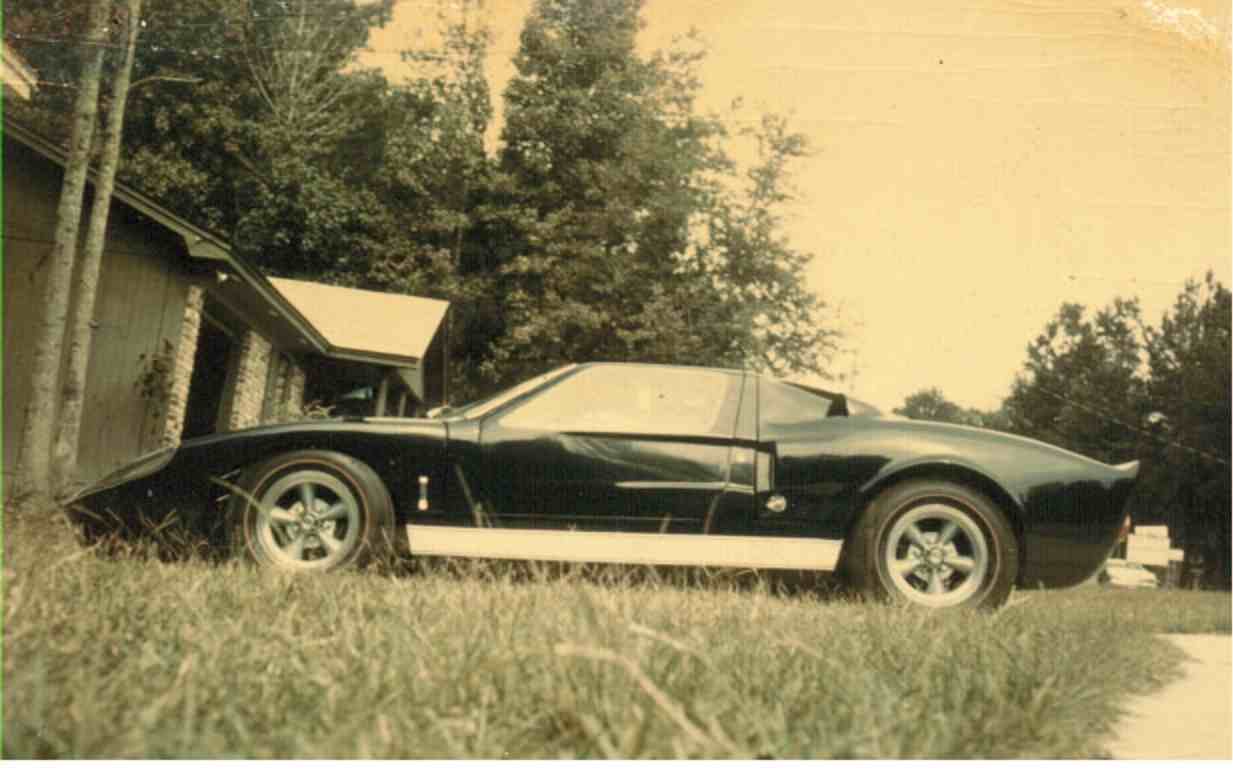
My drivetrain choice also necessitated some creative bodywork. The track of the Corvair is wider than that of the VW, and, thus wider then the GT40K, which was designed to fit the VW. This was not unanticipated, and in fact, had provoked much research into the styles of flares on Ford GT40's. By 1965, most of the GT40's had shed their original wire wheels in favor of distinctive magnesium pin-drives. With the pin-drives came a wider track, which required flaring the fenders at least the rears on most GT40's.
I modeled the flares for the Kellison on those used on the 1965 Sebring Ford GT40's (which I consider the most beautiful of all the many designs). The flares had to be fared into the body sills, so to ensure a good fit between the fender arches, which would be part of the hinged rear body, and the fared-in body sills; I bonded the rear body to the sills.
Using the tires that I planned to install on the car as a pattern, I radiused the wheel openings and formed a new ledge that stuck out from the body to cover the tires. This would eventually be the lip of the new flares. Fiberglass strips were laid from the fender to the lip and wrapped over actually under the lip. Layer by layer the flares were built up, until they were structurally sound and could be blended into the original fenders and body sills.
I used plastic body filler as a blending medium, and when the contours resembled those of the 1965 Sebring GT4O, I separated the rear body section form the body sills by sawing along the tops of the sills. The interior of the flares was then cut away, leaving about an inch lip in the wheel wells, which now covered the tires nicely.
I also used the 1965 Sebring cars as a model when correcting the shape of the "MkI" upper air inlets; which none of the kit car companies seemed to get right. The sensual contours of the air intakes proved to be too difficult for me to mold, so I did the next best thing: I covered them. On some of the GT40's raced in 1966, a hood was placed over the upper air inlets. I duplicated these by making a plug from expanded metal, body filler and Saran wrap, and casting the hoods in the female molds taken from the plug. These "scoops" were bonded and blended into the roof and fender lines, where they effectively concealed the less than perfect air inlets. I sometimes think that these air scoops enhanced the appearance of the GT40's that were referred to in retrospect as MkI 's
In 1971 the powers that be ruled that only round headlights could be used on American cars. Mildly rounded rectangular headlights were available, but could not be used in a car that was destined for the street. Single headlights looked lost in the wide fender of the GT40K, and even the Plexiglas cover couldn't disguise that appearance.
I opted for four round headlights surrounded by a chrome bezel from a '64 Pontiac Lemans I thought that was only appropriate that fit the contours of the fender perfectly. The headlight assembly didn't look half-bad with the Plexiglas covers on.
The doors of the GT40K were already rather heavy, so I opted to mount the latch assembly on the body, with only the striker plate and post mounted on the doors. This allowed me to open the doors from the outside by turning a key in the door lock on the B-pillar.
Both the front and rear body panels were hinged to open as they would on the GT40, and like many kit cars of the era, the body latches were rescued from Triumph Spitfires. I didn't like the large "M" that was cast into the Triumph release lever: so I made brass replicas and had them chromed. They were different enough from the stock Spitfire units that other car builders asked me to manufacture them, but the stock Spitfire latches were so inexpensive that there really wasn't any market for custom latches.
My GT40K kit came with the fiberglass "GT" seats. From what I've been able to gather, there were several other optional seat designs available from Kellison. The GT seats had wide bolsters that would provide good lateral support, but the seats were so wide that I would have been sliding around in them rather than fitting snuggly into them. To narrow the seats, I split them down the middle and removed wedge-shaped segments from the thigh-support area and the shoulder-bolster area. Metal reinforcements were riveted to the seats, which were then further reinforced with fiberglass. The seat bases and backs were then trimmed to conform to the rear bulkhead. Seat adjustments? Forget it; this GT40K was made to fit me.
Narrowing the seats left room for a console that ran from the footwall to the bulkhead. This would house the shifter and the emergency-brake lever while disguising the VW center hump. A rectangular recess in the upper surface of the console provided a home for a modified VW emergency-brake handle. The shifter was affixed to the VW pan with a lever protruding through the console.
Because the shifting rod exited the Corvair transaxle to the rear, rather than facing forward as it had in the Corvair, I needed to fabricate an entirely new shifter mechanism. Also, in order to keep the same H-pattern, the shifter must use third-class levers, where the direction of the force applied to the shift knob was the same as the direction that the transaxle shift rod had to be moved. (Most shift linkage moves the shifting arms opposite the direction that the shift knob is moved.) Likewise, the shift rod in the transaxle needed to rotate in the same direction as the shift knob, again, just the opposite of most shift assemblies.
Many mid-engine racecars solve this shifter problem by having the shift lever pivot about its base. The shift rod that goes back to the transaxle attaches midway up the shift lever, so it moves in the same direction as the shift knob is moved but less than the shift knob moves. Rotating the shift knob left and right likewise rotates the shift rod in the same direction. But the Corvair transaxle is not a race item: it required much more linear and rotational motion than a racecar transaxle does. The racecar setup didn't work in the GT40K.
What did work was a shifter that, like the racecar, pivoted the shift lever at its base so that the shift rod and the shift knob would move in the same direction. But, unlike the racecar, the bottom of the shift lever slid in a slot so that the shift rod could be rotated much more than if the bottom of the shift lever was fixed in position. This additional rotation allowed the transaxle rod to engage all of the gears. It all sounds so simple; it wasn't.
Because I had affixed the seats to the rear bulkhead, it would have been impossible for me to reach the dashboard while constrained by a four-point seat harness. The solution was to install an overhead console with switches for the ignition; fuel pumps, headlights, starter, windshield wipers, etc. Because many of the circuits that controlled these items would carry considerable amperage, the overhead switches would normally have been large and bulky. But instead, I used miniature switches that controlled relays that handled the high current load. The overhead console, as well as the console between the seats, was upholstered in the same gray, leather-grained vinyl that was used to upholster the rest of the interior.
As you might expect, several minor mishaps occurred during the construction of my GT40K. The only major one involved installation of the windshield. When it finally came time to install the Corvair windshield that I had been storing in my bedroom for months, I cleaned the windshield frame thoroughly: and carefully lined the frame with the rope of GM butyl windshield adhesive. A friend helped me place the windshield in position, and when we had it just right: we applied uniform pressure on the windshield to squish the butyl rope. We learned that it is virtually impossible for two amateurs to apply uniform pressure to a windshield: a crack propagated from the top to the bottom of the windshield!
The smart thing to do would have been to have a glass shop install a new windshield; but I did the inexpensive thing. I found another Corvair windshield at wrecking yard, and carefully removed it no mean trick. Then, instead of using the butyl adhesive rope, I ran a bead of black RTV adhesive around the windshield frame and laid the windshield onto this bed of adhesive. I needed to put a spacer at the bottom of the windshield to keep it centered in the frame. I added beads of RN in several layers until the gap around the windshield was completely filled.
J.C. Whitney supplied the ideal material for framing the windshield and backlight. It was black vinyl side molding with a vacuum-metallized chrome strip in its center. The molding, which came in rolls, was designed to conform to a ridge on the side of a car, so it was hinged along its centerline. It was flexible enough to follow the curvature of the windshield and backlight, and it could be mitered to form tight corners at the top and bottom edges of both.
Next time we'll take up the saga of obtaining title and registering a "Specially Constructed Vehicle."
BUILDING A KELLISON GT40K IN THE '70'S
By Tom Piantanida
Chapter Three Finishing Touches and Legalities
I began the GT40K project in Bellaire, Texas, and concluded it in Tallahassee, Florida. Oddly enough, I found another Kellison GT40K kit owner in Tallahassee. We were able to exchange information that made both of our lives easier.
In preparation for the trip from Texas to Florida, I attempted to accumulate all of the documentation that was required to obtain title and to register the GT40K. I had guessed, and rightly so, that Florida's requirements for "legalizing" the GT40K would be different from those in Texas. And, I didn't want to take a chance that Florida would not honor some of my bills of sale for component parts of the GT40K.
One decision that pleased both my landlord and my wife caused me unbelievable grief. When I had truncated the V~V pan and removed all of the saleable parts, I disposed of the dissected after section. This may seem innocent enough, but it left me with a VW pan and a VW title that were no longer related to each other. The chassis number was on the pad of the pan that I had discarded. I had no way to prove that I owned the chassis that supported the GT40K body.
The Texas Department of Motor Vehicles had a fix for such situations. It required only that a peace officer inspect the chassis to determine that there was NO vehicle identification number anywhere on it. When I contacted the DMV, I was told that their department was not authorized to examine the chassis, but I should contact the State Highway Patrol. Unfortunately, the State Highway Patrol never heard of anyone attesting to the fact that there was NO vehicle identification number; but they would be happy to verify a vehicle identification number for me, if I had one.
The Harris County Sheriff, likewise, had never been asked to perform the task of verifying the absence of a vehicle identification number, and they weren't about to start. Beside, they said, they lacked jurisdiction; I should contact the Bellaire Police Department.
When I flagged down a Bellaire Police officer, he came to my house and looked at the partially assembled car, taking quite a bit of time to examine its features. However, he could not find a vehicle identification number, so he could not verify from my VW title that I owned the vehicle. But, he was not about to stick his neck out and take my word for it that there was no identification number on the GT40K. So, at this point, I was in possession of an unidentifiable vehicle: which the local police now viewed with suspicion.
Ultimately, I was able to find a peace officer a county constable who would verify that there was no identification number on the vehicle. With the constable's certification in hand, I was able to get the great state of Texas to issue me a State Vehicle Identification Number and a metal ID tag to rivet to the chassis. I then officially owned a Special Construction chassis. I had worried about not having receipts for the materials the Unistrut that comprised the rear subframe, but that didn't seem to bother the Texas DMV.
What did bother them was the engine. The Corvair title that I still had, after disposing of the chassis, did not list the engine number T0401 RY, which merely identified the engine as having 140 horsepower and a Powerglide transmission, and having been built in Tonowanda, NY, on April Fool's day of some unspecified year. Likewise, the engine did not have the vehicle identification on it, so it was impossible for me to prove that the engine in the GT40K was the very one that had been installed in the Corvair by the factory. The former Corvair owner still lived in Houston, sol asked him if he would provide me with a statement verifying that the engine I had was the one he had sold me. Since he actually had no way of knowing whether my engine was the one in the Corvair that he'd sold me, he declined my request,
After inquiries at several levels of authority within the DMV, I finally found someone who held the answer. All I had to do was to sign an affidavit stating that the engine T0401 RY was the very one that was in the Corvair when I bought it.
The next hurdle was a weight certificate. Texas needed to know just how heavy the GT40K was so that the DMV could calculate how much it would charge me to register it. But, because the GT40K was not yet registered, it could not be driven to the only location where a certified weight certificate could be issued Mayflower Moving and Storage. So, once again it was necessary to trailer the vehicle, only this time it was much closer to functional that it was the last time it was on a trailer.
Then came further inspections: Approved windshield yes, it had an AS-1 certification; backlight no certification, but none is required; standard quad headlights, yes; wipers, yup; taillights and brake lights, check; etc. Never mind that it's not drivable, it's still a motor vehicle. And, finally, I held Texas title to my very own GT40K.
The GT40K had to take a backseat to my studies for a while, so it was not yet drivable when the time came to move to Tallahassee. No problem: we could rent a car trailer from a truck-rental company and haul the GT40K on that. Wrong! A one-way rental of a car trailer was not a possibility in the early seventies. It was possible to rent a car trailer, but there would be a premium equal to the amount of the one-way rental because the truck-rental company would have to return the trailer to Houston,
Our solution was to rent a 22-foot rental truck plus a 12-foot trailer; and to buy two rough-cut oak two-by-twelve's. The lumber would become ramps for loading the Kellison into the truck in Houston and for unloading it in Tallahassee. Our furniture and belongings were packed carefully around the GT40K. What wouldn't fit into the truck went into the trailer. The GT40K made the trip unscathed, and then it became the occupant of yet another one-car garage, but one twelve feet wide; rather than its ten-foot-wide home in Bellaire.
Although I've alluded to building the flares and the upper air scoops in a previous chapter, they were actually constructed after the trip to Tallahassee. With most of the mechanical work on the GT40K finished, my efforts focused on bodywork, paint and interior. Using photos of Ford 0T40's to determine paint and interior colors, I selected a heavyweight, gray vinyl material to upholster the interior. I farmed upholstery of the seats out to a professional, and upholstered the rest of the interior myself.
Instrumentation consisted of a matched set of Stewart-Warner Stage Ill gauges, including speedometer/odometer, 6000RPM tachometer, oil pressure, oil temperature; ammeter, and fuel-level gauges. The dash also contained a high-beam indicator, directional indicators, idiot lights for oil temperature and pressure, and hidden underneath an 88dB Sonalert wired into a low-oil-pressure switch. These were housed in a recessed instrument panel directly in front of the driver.
I had wanted to paint the GT40K in the same shade that Ford used on the 1965 Sebring cars (Ford used this color on many of its GT4Os), but I learned to my dismay that it is exceedingly difficult to color match from photographs, especially those printed in magazines. At the time: I did not realize that the color was called Guardsman Blue, which I could have purchased at any auto-paint store. What I selected as a match was a 1973 Lincoln color called Bright Blue. The lacquer-based paint looked fine when it was being applied under artificial light, but once outside in the light of day, it was much too dark. That was a disappointment I lived with. The paint was truly beautiful, but it was the wrong color.
Painting the car was not without its moments. First, some of the primer that I had used on the car over the years was incompatible with the lacquer primer. After several attempts to find a good compromise, I had to shoot the whole car with zinc chromate primer to seal it. Only then could the real priming begin, and then much care needed to be exercise to avoid sanding through the zinc chromate. After several color coats had been applied, and the car color sanded, it was getting late in the evening and the humidity was rising. So, I decided that one more coat would do it for the night.
Just as I had applied the "last" coat to the front section of the GT40K, a huge moth flew into the garage obviously drawn to the luster of the car and landed in the wet paint. When I plucked the offender from the car. I found that he'd literally made his impression. A quick block sanding leveled the surface enough so that only I would know where the moth had landed, but when I shot on some color, the paint "blushed," The humidity was too high to continue,
On the following evening, additional sanding and painting removed any lasting reminder of the moth. Several coats of lacquer with increasing amounts of thinner brought the finish to perfection. The car then sat in the closed garage a friend's garage for nearly a week. That weekend, as I opened the garage door, I found that my friend had removed the vicegrips from the doortrack, which allowed the door to fall off the end of the track onto the roof of the Kellison. More sanding, painting, and sweating ensued, but finally the exterior of GT40K was finished.
The upholstery was the last item to be accomplished, and when that had been completed, I could look at my GT4DK with no small amount of pride.
I had been able to transfer the title from Texas to Florida with relative ease, so all that remained was to register the car. One requirement for registration was a State of Florida inspection, which is done at official inspection stations. I got a temporary permit to drive the GT40K to the inspection station, listening intently for any signs of impending mechanical failure. There were none. At the inspection station, the officer filled out various forms as I answered his many questions. When he came to the part where he asked: "How many miles on the car?"
I answered: "Eleven"
"Eleven thousand?'
"No. Eleven miles. That's how far I live form this inspection station,"
All the necessary items checked out, and I was issued my inspection sticker. With that and money, I was able to register the GT40K as an "Assembled Vehicle."
What turned out to be the First Annual Tallahassee Rod and Custom Show was about to be held at the Tallahassee Mail under the guidance of Neil Davis of N&E Speed & Machine, so I entered the GT40K, which was then displayed in a prominent location. At various times during the show, I overheard adolescent males describing to their dates how the doors on the GT40K were gull-wing doors, which opened "up," rather than "out." Usually, after the explanation, I would open the doors: which, of course, were hinged like most car doors.
At the end of the show, my GT40K was awarded Best Custom and Best of Show; my daughters also were awarded a prize for having polished the most fingerprints off a car. I drove the GT40K sparingly, and about a year later! I trucked it to Atlanta to a Hudson & Marshall Specialty Car Auction, where I sold it. A few years later, I was contacted by a subsequent owner who had crashed the car and wanted to know if I would be willing to repair it for him. I declined, telling him that I much preferred to remember the GT40K as it had appeared at the Rod & Custom Show and at the auction. And that's how l remember it.